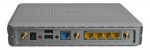
 Late last night, my router went down. Checking it, I saw that the lights were all off. Huh. So, I unplugged and replugged it, and it came back up. Figuring it was a glitch, I went back to bed, and thought nothing of it. This morning, I found it was off again, and re-plugging it would do nothing. Crap.
So, I pulled it off the wall, and opened it up. Hey look, a bad capacitor. It’s labeled as a 680uF 16V cap, with a nice bulged top. After finding a replacement in my capacitor stash, I went about removing the old one… which was, a pain. Mainly because it’s on a huge ground plane, so heating the leads enough to get it removed was a challenge. Even my FR-300 desoldering gun took a bit of work to get things hot enough to melt. But, after about 5 minutes of working on it, I got the old one out, and the new one in. The new one is a bit taller, but it does fit ((And yes, I’m okay with a 16V capacitor in this case since the power supply is 12V (meaning a 75% derating) and the whole thing lives in my garage which is never above 20C. Yes, I know it’s above the minimum 70% derating, but not by much, and I didn’t have a 25V that would fit.)) ((Also note: Asus, at least on this board, paints their capacitor markings backward. Where normally the negative capacitor lead would go in the solid white marked hole, it is actually the positive as can be seen for all the other caps on the board. Why Asus does this, I have NO idea.)).
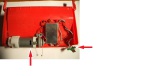 Just a quick post, but the other day, my Roomba proceeded to suck up a baby wipe (that my son had apparently left somewhere randomly and I didn’t see while picking up the main floor before bed), and the brushes jammed up enough that it didn’t trigger the “clean brush” warning, but probably overheated the Cleaning Head Module (CHM) motor (see picture). After removal, the brushes refused to run. Spinning the brushes manually was easy, so it wasn’t physically seized. Unfortunately, replacing the motor (eBay) is basically the same price as buying a whole new CHM. Checking the electrical resistance on the motor was about 8ohms. Not too bad, but, I’ve never cleaned the motor, so I gave it a few good squirts of DeoxIT, and spun it a while. Checked the resistance again, and it was 22k ohms. Huh. Hooked it up to my bench PSU at 9V, and powered it up. Nothing. Crap.
 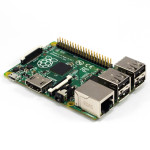 After trying to control multimeters, programmable loads, power supply, etc, I decided I really needed some device to “run” my bench. Plus, I had a nifty USB GPS receiver (Delorme LT40) I picked up for $5 that I wanted to use, and seemingly only works in Linux anymore. Anyway, knowing all this, I decided it was time to finally buy a Raspberry Pi, and since it’d been a while from when I last looked at their offerings, I was excited to see the B+ model, which had 4 USB ports (perfect!).