Everybody Staze...

Nobody leavz...

  • Home
  • About Me
    • LinkedIn
    • Lab
  • Contact
  • Links
  • Reviews
  • Sitemap
  • Weather
You are here: Home / Archives for Electronics

Antec TruePower Trio TP3-550 Fan Bus Repair

2015/02/03 By staze

TP3-550
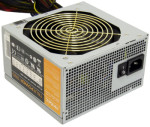
Couple weeks back I got a request to repair a friends computer. It would lock up, not reboot, etc. The computer was largely for gaming, so after an initial software scan, I figured it must be heat. Opening the machine, I noticed none of the case fans are running. I had initially done the build on the machine, and new all the case fans were wired to the fan power “bus” provided by the power supply (which handled speeding/slowing the fans based on case temp), an Antec TruePower Trio TP3-550. Asking the friend, he mentioned that he had noticed the LEDs on the front case fan had went out a month or two ago. Hmm. Checking the voltage on that fan bus showed only 2V (not nearly enough to run a 12V 120mm fan). The PSU’s fan was also not running. Crap, that was probably overheating the PSU, and causing the instability.

Wanting to get his machine back up and running, I picked up a replacement Corsair power supply, installed it, and got him on his way. Then, I went to repairing the Antec power supply. Warning, because this is a power supply, and especially because this is a high wattage switcher, there are dangerous (and lethal if you live in parts of the world that run off 220/240 household) voltages inside. Make sure the unit is unplugged, off, and even give it an hour or two for the primary caps to discharge. I have seen the primary discharge relatively quickly, so there must be a bleeder resistor in the unit, but I didn’t bother tracking it down.

[Read more…]

Filed Under: Electronics Tagged With: Antec, ATX, repair

Racal-Dana 1992 Button Repair

2015/01/18 By staze

racal-dana-1992-frequency-counter
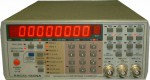
Like nearly ever other Racal-Dana 199x owner, I have the mushy/lifeless buttons, so this last week (during vacation) I decided to do the replacement work. It involved unsoldering all the stock buttons (34 of them). Thankfully I have a Hakko FR-300 desoldering gun that made very quick work of removing the buttons ((note: you’ll need the N50-06 tip to fit around one of the lugs on the buttons, which for some reason have one small, and one large lug)). Took maybe 5-10 minutes to remove all the original buttons. The replacements I used were Panasonic EVQ-21509K switches. The only issue with these is the hole spacing on the board is not “standard” so you have to work at placement to get them lined up. Some others have purchased 4-contact switches on ebay, and cut two corner legs off, and then installed the switch angled 45°. In hind sight, this may have been easier since I had to tweak things a bit to get all the switches lined up.

The real bear of the install was modifying the key caps to fit the new buttons. The original buttons have a cross top that fits into the buttons, and holds them on via simple friction. The new buttons, however, are standard cylindrical actuators. Modifying them required some side cutters (which anyone in electronics will have), and needle nose pliers to twist out the cut pieces. The worst part is on your fingers, as holding the buttons gets pretty painful over the 34 of them… but after an hour or so of work, I had them all done, and waiting to be glued. Then the realization hit me. Because of the weird leads on the Panasonic switches, they didn’t sit flat against the PCB, so the switch stems weren’t perfectly upright, and therefore the key-caps didn’t sit in the holes right. Damn it.

So, admitting defeat, I ordered some cheap 4 contact switches on ebay (6x6x9mm, same as the Panasonic’s), and removed all the panasonic switches (again, thank god Hakko FR-300). 3 weeks later, the eBay switches arrived, and after removing two corner legs, the new switches sit much better, albeit, diagonally (who cares). The legs did have to be bent a tiny amount, but the biggest issue was really just pressing the button against the PCB while soldering it in place. Total time to install all the new buttons took about an hour. Clearing out the inner part of the button caps took a bit longer, and gluing them in place was a bit of a pain, but wasn’t terrible. And really, having working buttons made all of it well worth while. Good luck!

Filed Under: Electronics Tagged With: eBay, Hakko, Racal-Dana 1992

Quick repair of Fluke 87 (Faded Digits)

2015/01/09 By staze

Fluke 87 Faded DigitsAt my suggestion, a coworker purchased a Fluke 87 (Series 1) off eBay, with the faded digit problem, for $70 a week ago. A very good deal. I assured him I could repair it.

The meter arrived, and really, there was very little fading, but it still needed “repair”. Rather than bring it home, I pulled it apart here and showed him what to do (should it happen again). Mr. Modemhead has a great article on this, but also there is a video from Fluke themselves on the issue, even though they’re incorrect on some facts with regards to the original 87 (they say there’s only one zebra strip, when there are two). Anyway, I’ve done the modemhead way, but I thought I’d try Fluke’s suggestion, and just clean the PCB side of the connection. I used some cotton swabs and 99% IPA, and after a couple minutes of scrubbing until clean, I put everything back together, and bingo! It works great. =)

Interestingly, this meter also had a slight issue with the buzzer/beeper. Turns out the speaker (Piezo) uses two rubber “nipples” to make contact with contact points on the back of the PCB. One of these nipples had been squashed/distorted over time and if you screwed the back of the meter on fully/snuggly, the nipple would distort enough to lose contact with the PCB. Simple solution was to leave the middle back screw loose, and place a piece of tape over the screw. Problem solved. =)

Filed Under: Electronics Tagged With: Faded Digits, Fluke 87, Multimeter, repair

« Previous Page
Next Page »

Weather

Categories / Archives

  • Apple
  • Coding
  • Electronics
  • Energy
  • Home Ownership
  • Miscellany
  • Politics
  • Prius
  • Sys Admin
  • Travel
  • Uncategorized
  • Work
  • April 2026
  • August 2025
  • April 2025
  • January 2024
  • February 2021
  • July 2020
  • January 2020
  • April 2019
  • March 2018
  • February 2018
  • June 2017
  • February 2017

Copyright © 2026 · Staze On Genesis Framework · WordPress · Log in