 Ages and ages ago, a coworker brought me his Fender Frontman Reverb amp saying it didn’t work. He had a second one that did work, so there wasn’t any rush to get it working, so I took the unit home, and went to work on it. Disassembly was easy enough, and finding the schematics showed that the unit was identical to the Fender Frontman 15R, which has schematics (in the service manual) here. The US Fender site SAYS it has schematics for the 15G-15R, but only the 15G is shown, meaning the whole reverb section is left out. =/
Repair of Nikon SB-600 Speedlight
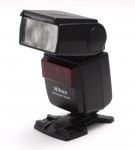 While loading the car for a shoot several weekends ago, I proceeded to drop my Nikon SB-600 from about 2 feet high onto the tile of my mudroom. I thought “crap, hope that survived”, and finished packing. I set up at the shoot, and my wife (who’s the actual photographer) started shooting, but complained the flash wasn’t working. Looking at it, the screen was misbehaving, it would flash inconsistently, and then after trying to power cycle it, it wouldn’t come back on. Uh oh. Shaking the flash, I heard rattling. Crap.
While the shoot was going on, I started looking online, and as it turns out, this is extremely common. It appears that the battery compartment rests on top of a large SMD inductor, that when the unit is dropped, with batteries installed, the impact crushes that inductor, which usually takes out the diode above it. See the ifixit article. Anyway, after the shoot (one flash down) a got the unit apart, and found that indeed, those two components were damaged. Also, while sifting through the rubble of the crushed inductor core, I found a 3 pin SOT-23 device. After looking, it came from the ZD301 spot. A zener diode. Huh. It’s marked 431, but it doesn’t appear to be a TI LM431. Some searching got me to a Russian site that indicated the unit was an RD43B-M, or a 43V zener! Apparently it’s some protection for signals coming in from the hot shoe (I think). No idea why it’s 43 volts, but…
Rowenta DG580 repair
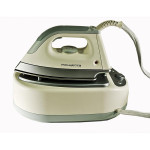 Mother-in-law, ages ago, gave me her broken Rowenta DG580 steam iron to me saying it was broken. The switch was basically doing nothing. So, I sat on the thing for months not wanting to touch an iron (boring). But, finally took a look recently. First up was the o-ring on the fill stopper. I ordered a replacement from Rowenta, but it didn’t fit at all. I also ordered a whole new cap, and it worked, but looked ugly. So I went to a local o-ring shop, and managed to find a replacement o-ring that fit pretty well. It’s a -208 silicone o-ring. It’s not a perfect fit, and a -312 might fit better, but they didn’t have any. The only difference being the thickness of the o-ring.
 Now, the trigger. Opening the iron required a security torx bit, then pulling off the top of the handle. The trigger, at this point, was obviously broken at the narrow point. My first attempt to fix this was simply some two part epoxy made specifically for plastics. This held for about 2 shirts worth of ironing before re-breaking. My second fix was what I should have done in the first place. I took a soldering iron on “low” (about 600F), and melted a line down the length of the narrow part of the trigger, then “mixed” the resulting plastic together then back down in the channel than had been created. Effectively “welding” the plastic back together. I then went around the periphery of the narrow part, to further weld it back to the main trigger. While not pretty at all, it does hold, and I was unable to break it with a moderate amount of force, and also pulling the trigger as hard as possible. If this fix does not work, my next step is to make a mold of the trigger with silicone rubber, then make a resin cast replacement of the trigger (I’ve also thought about 3D printing a replacement, or worse, having a metal trigger machined). Sadly Rowenta stopped making replacements some time ago.
Not sure if this will help anyone with this issue, but hopefully someone will find it useful. =)