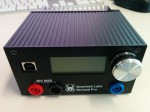
 I have wanted a Programmable load for a while, and truly needed one since I purchased an unknown quality HP 6624 for $10 at Goodwill and needed a way to test it before re-selling. I’ve looked at the venerable BK Precision, as well as the “knockoff” (or OEM, depending on who you believe), Maynuo equivalent. But, I just couldn’t swallow the $300+ price tag. I also looked at building one, but it just never made it on my list. But then, Arachnid Labs came to the rescue, and created the Re:Load Pro, a programmable version of his inexpensive Re:Load that offered a simple DC load equivalent to Dave Jones’ venerable one from years ago.
Unfortunately, I somehow missed the Kickstarter for the Re:load Pro, so I had to order one off Tindie and wait for them to ship. Thankfully for my pocketbook, and my wife, I had some money in Paypal from an eBay sale that I used to buy the Re:Load Pro.
After four months or so, the unit did finally ship (manufacturing is never easy, but at least it was a successful Kickstarter), and a few days later it arrived from California. While the packaging wasn’t great (just one small piece of packing paper to keep the smaller inside box from shifting around (which it did)), the unit looked in fine shape. It’s small (though pretty dense considering it’s solid metal contruction)! Measuring only 111mm wide, by 58mm tall, by 108mm deep, with the heatsink being about 25mm of that depth. The heatsink is a pretty beefy hunk of aluminum (aluminium) with two large outer fins (for mounting fan assembly), and 12 inner fins. The finish of the heatsink isn’t the greatest, but the designer has already told me they’re switching extrusion houses, so that should be remedied in future revisions (and really, the heatsink works just fine, it’s mainly some blemishes in the anondization). The control nob, while not as pretty as the one initially shown in designs, feels very nice, and very solid, and was custom made for the unit as the original spec’d nob did not hold up to extensive use.
The unit has a simple USB-B connection on the front for power and computer control, and three banana jacks (the positive and negative being the standard 3/4″ (19.05mm) apart (meaning it accepts standard double banana plugs)) and one banana jack that serves as a trigger (though I have not tested this, and am not sure it’s implemented yet). Firmware upgrade was suggested prior to first use, which was easy enough following the directions posted here. After that was done, I calibrated the unit, which is simply setting it’s 0V point, and then hooking it to a power supply to draw X voltage and 2A (with 9.99V being ideal). Time to calibrate was less than a minute.
Performance of the load after calibration seems to be excellent. I’ve been able to characterize a few batteries easily (set minimum voltage for rechargeables unless you want to potentially kill the battery) (which I’ll post the graphs a bit later), and test a few power supplies. The biggest issue is that the resolution on the ADC only currently allows for 10mA settings increments, and that logging has to be done to a computer. I’m considering picking up a Raspberry Pi for the “lab” that I can use to log data from the load, as well as serve some other purposes. Means I won’t have to keep my laptop open all the time. =)
Really, the unit has been worth the wait. I do hope the fan option is released soon so that I can put a bit more power into the unit… I have a couple power sources that may need to dump more than 25W continuous into the load. Even with a fan, though, the heat transfer from the power FET to the heatsink starts to become an issue (the FET is only so big, so there’s a barrier to the heat transfer). They really should make bigger FETs for this type of thing. =)
Anyway, look forward to some results (posts) from having this in my testing arsenal now. I only hope it doesn’t encourage me to buy a larger, more expensive, load. =(
[xrr rating=5/5]

Dorian Wiskow says
Did you develop some software fro data logging from the Re:load Pro?
staze says
I did not. =/