Everybody Staze...

Nobody leavz...

  • Home
  • About Me
    • LinkedIn
    • Lab
  • Contact
  • Links
  • Reviews
  • Sitemap
  • Weather
You are here: Home / Archives for Home Ownership

Pruning

2010/01/23 By staze

The weather today lent itself quite well to yard work, which is nice as we still hadn’t cleaned up the mess from the wind storm earlier this week. Tara started with just raking up the driveway, and we quickly moved to spraying the moss on the walk way with iron (a good, low impact, way to kill moss). Then on to pruning our maple in the front yard. Normally, pruning japanese maples should be done either right after leaf fall, or in mid-summer. But, we’re impatient, and I figure since we’re sealing the wounds, bleeding should be minimal.

We removed about 1/4 of the total foliage I would guess. But, I would say after 3 years of doing this, we now have a maple that looks presentable (at least skeleton wise). We will have to see what it looks like once it leafs out.
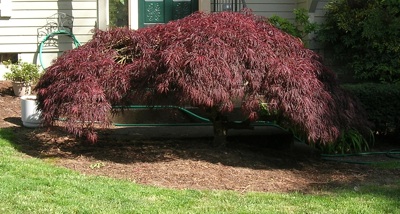
Leafed out Acer Palmatum, Summer 2009

Acer palmatum dissectum, Summer 2008

You might think it looks spartan (below image), but given what it used to look like, a giant blob (gumdrop, right image), this is a huge improvement. This is more what you would expect from a japanese maple you’d see at a Japanese garden somewhere. I’m no expert, but I know the basic theory of removing crossing branches, parallel branches, branches that move directly toward or away from the viewer, and opening up the structure to allow the viewer to admire the structure of the tree. We also removed or trimmed branches to keep the leaves off the ground when it does leaf out (this was an issue last year).

Overall, the goal is to produce a tree that looks like an older, larger, more mature version of itself or similar tree.
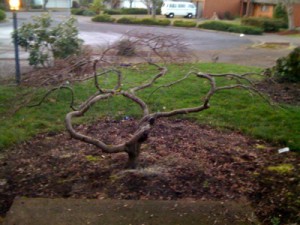
Acer Palmatum

Acer palmatum dissectum, Winter 2010

Not sure if we succeeded, but we do believe it looks better. My only hope is that we didn’t open it up so much that we get bark scalding during the summer, but that shouldn’t be an issue since it will be leafed out enough by then, as well as the fact that it barely gets any direct sun anyway. We have Douglas fir’s that shield it from the south sun. It gets a bit of late evening sun, but that shouldn’t be an issue either.

Also pruned the Rhododendron next to the lamp post in this picture (it was rather blob-ish). This should cut down on the aphid infestations it gets during the summer. Aphids tend to dislike airflow. Also gave all the rhodie’s in the yard a spray of iron to help with chlorosis.

I’ll try to remember to post some more photos once the maple leafs out and we see how it looks. So, expect more on this in about 4-5 months. =)
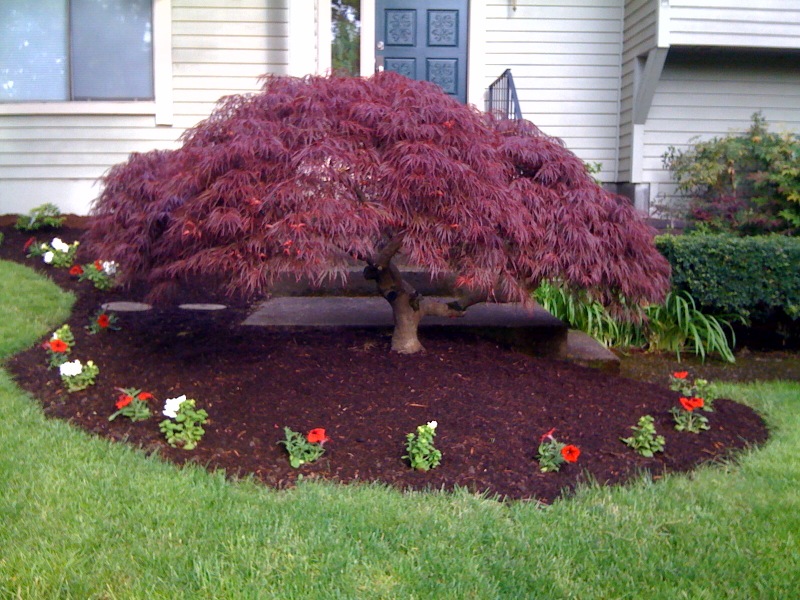
Acer Palmatum

Acer palmatum dissectum, Summer 2010

UPDATE: Here is a picture of the maple after it has leafed out. You can really see how the width has been reduced from the 2008 picture above. You can see the trunk line in the image as well as the first branch comes off at just about the perfect height (it’s a bit low, as it should be at 1/3rd of the way up the tree, but it’s not bad). While it needs a bit more refining, it’s pretty close to where I’d like it to be from now on. I also need to clean up a couple wounds on the tree. I’ll need to get some concave cutters, and hollow out the stump and seal up the wound. Hopefully I’ll take care of this during the summer. Try to get some “cut paste” to seal the wound, and make it match. There is a hole in the canopy that can’t be seen from the front that needs to fill in as well, since heavy sun on the wood of a maple like this can cause scalding, and the death of the branch. I’ve wrapped it with some trunk wrap for now, hoping that it won’t burn before the hole fills in. All and all, it’s taken 3 years to get this far, and from now on, it should just be simple maintenance. I think it should look even better once the new mulch rots a bit and turns “black”.
Filed Under: Gardening Tagged With: Acer dissectum, Acer Palmatum, Pruning, rhododendron

Been a bit…

2009/09/15 By staze

It’s been a while since I posted, so there’s actually going to be a few posts in a row here.

First, just a house and home update. We just sold our bird, Pablo, to someone else in the area. $20 for all his stuff, which easily was over $100 is equipment. It’s going to be weird to not have him wake us up anymore. But, he’s a pretty noisy bird, so all and all, it’s a good thing. He is/was a probably 10-12 year old Parakeet. Yeah, they don’t normally live that long, but they can apparently live to be 20-25, so I guess we’re just “lucky”. =)

I replaced the webcam, so the image on the front page should “work” now. Though, this camera has a bad habit of making the sky purple with the macam drivers. It’s an Intel CS430 PC Camera Pro. It’s ancient, but it works. I have another camera I might try later, but at this point, it should work.

I haven’t been working on my website in a while, but I hope to start that again soon. There are some errors in the code for the summary of power data (mainly the power used since last reading).

We’re going to have the plumbing installed for a laundry sink end of this week. It’ll be sweet to get a sink down there. I hope to install an RO filter under it, so that I have clean water for plants (carnivorous plants, as well as epiphytic orchids prefer squeaky clean water). Once we have the plumbing installed Tara’s going to build a cabinet for the sink, and we’ll buy the sink (Thermocast Kensington). It’s pretty sweet, it has an integrated washboard.

All and all, that’s about it. I’ll hopefully post more tonight or tomorrow about work related stuff. Since 10.6 has shipped since my last post, and a few other things have happened.

Filed Under: Home Ownership Tagged With: macam, Thermocast Kensington

Weekend Project

2009/07/21 By staze

So, last weekend at the beach, I found a picture of what someone else was doing for keeping Carnivorous plants (link here about half way down the page, on the right side).

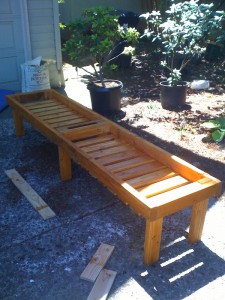
Plant bench, pre-plastic

Plant bench, pre-plastic

Based on that picture, Tara drew up a basic diagram. It required 4 2×4’s (8′), and 5 1×4’s (8′). The picture indicates one large table. I modified the idea to split it into two areas. One that will hold Bonsai, and other “normal” outdoor potted plants, and the other that will hold carnivorous plants.

Parts list is:

2-2″x4″x8′
10-2″x4″x18″
18-1″x4″x21″
2-2″x4″x10.75″

40(ish)-8×3″ deck screws (for the framing)
36-8×1.75″ deck screws (for the slats)

So, two full 2x4s, then 2 of the 2″x4″x18″ pieces create the narrow sides (interior attached, so the actual dimension is 8’x25″). Then install two more of the 2″4″18″ pieces in the center to surround the middle legs. Legs are also 2″x4″x18″, attached parallel to the the short sides, on the interior of the “box”. The two short pieces of 2″x4″ go between the outer legs to make it a rectangle area rather than a wonkey “plus”. Then just attach the slats. I think ours are about 1.25″ apart.

We then got some deck stain/sealant, since the wood is just Douglas Fir (not the best for outdoor longevity), and stained/sealed everything. Put some extra just on the bottoms of the feet. I’m thinking I might make some slices of pressure treated wood to put on the bottoms of the feet, just to be extra carpenter ant safe.

Last part will be to line one side with plastic (probably put some type of fabric under the plastic to help prevent any punctures), and staple the plastic to the top of the frame. Then run 1″x2″ around the perimeter to cover the plastic and make a nicer edge.

Our only regret at this point is not using nicer wood. If we were to do it again (which we probably will in the next few years when this one wears out, or we need more space), we’d use Cedar.

I’ll post another couple pictures when I’ve got the plastic on, and then when I’ve got it “populated”. Maybe also post a design drawing.

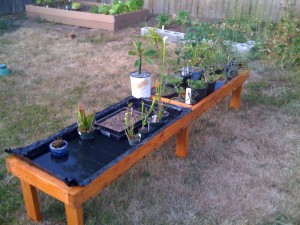
Lined and Populated

Lined and Populated

UPDATE
Here’s the “bench” with the plastic installed on one side, and plants in place. Obviously I have some room for more Carnivorous plants. My Bonsai side, however, is a bit crowded. It’ll be better once I transplant a few of them into proper pots instead of gallon nursery pots.

Only issue is there’s a small hole in the plastic, so there is a slow drip on that side. This isn’t a huge deal since carnivorous plants, by and large, don’t like to be waterlogged so much as wet. So the water level slowly dropping via evaporation and the leak are okay. I still plan to replace the plastic with non-leaking plastic (probably pond liner), but it’ll work for now.

The final task is going to be running the 1″x2″ stained and sealed “trim” around the top edge. This’ll make the whole thing look nicer, and hide the plastic on the carnivorous plant side. The whole thing does make watering a heck of a lot easier. And once the plastic no longer leaks, I figure even in the hot summer, I’ll only have to refill the carnivorous plant side once every couple days.

Only issue will be, in the winter. how I try to keep the water level down to prevent root rot. I can either elevate the plants, or I could install some type of drain. I’m liking the drain, but I’m not sure how it’ll work. Guess I post a new item when I figure that one out. For now, this post is done. =)

Filed Under: Home Ownership Tagged With: bonsai, carnivorous plants, carpentry

« Previous Page
Next Page »

Weather

Categories / Archives

  • Apple
  • Coding
  • Electronics
  • Energy
  • Home Ownership
  • Miscellany
  • Politics
  • Prius
  • Sys Admin
  • Travel
  • Uncategorized
  • Work
  • June 2026
  • April 2026
  • August 2025
  • April 2025
  • January 2024
  • February 2021
  • July 2020
  • January 2020
  • April 2019
  • March 2018
  • February 2018
  • June 2017

Copyright © 2026 · Staze On Genesis Framework · WordPress · Log in